To open the embedded web server
1. Obtain the IP address or hostname for the printer.
a. Press the (Wireless) button on the printer control panel.
b. Using the buttons on the right, scroll to and select View Wireless Summary.
2. In a supported web browser on your computer, type the IP address or hostname assigned to
the printer.
For example, if the IP address is 123.123.123.123, type the following address into the web
browser: http://123.123.123.123
TIP: After opening the embedded web server, you can bookmark it so that you can return to
it quickly.
TIP: If you are using the Safari web browser in Mac OS X, you can also use the Bonjour
bookmark to open the EWS without typing the IP address. To use the Bonjour bookmark,
open Safari, and then from the Safari menu, click Preferences. On the Bookmarks tab, in
the Bookmarks bar section, select Include Bonjour, and then close the window. Click the
Bonjour bookmark, and then select your networked printer to open the EWS.
Appendix E
206
Printer management tools

F
How do I?
•
Get started
•
•
Scan
•
Copy
•
Fax
•
Work with ink cartridges
•
Solve a problem
How do I?
207

G
Errors (Windows)
Fax memory full
If Backup Fax Reception or HP Digital Fax (Fax to PC or Fax to Mac) is enabled and the printer
has a problem (such as a paper jam), the printer saves incoming faxes to memory until the
problem is resolved. However, the printer’s memory might fill up with faxes that have not been
printed yet or transferred to the computer.
To solve this problem, resolve any problems with the printer.
For more information, see Solve fax problems.
Unable to communicate with printer
The computer cannot communicate with the printer because one of the following events has
occurred:
•
The printer has been turned off.
•
The cable connecting the printer, such as a USB cable, has been disconnected.
•
If the printer is connected to a wireless network, the wireless connection has been broken.
To solve this problem, try the following solutions:
•
Make sure the printer is turned on and that the
(Power) light is on.
•
Make sure the power cord and other cables are working and are firmly connected to the
printer.
•
Make sure the power cord is connected firmly to a functioning, alternating current (AC) power
outlet.
Low on ink
The ink cartridge identified in the message is low on ink.
Ink level warnings and indicators provide estimates for planning purposes only. When you receive
a low ink warning message, consider having a replacement cartridge available to avoid possible
printing delays. You do not need to replace cartridges until print quality becomes unacceptable.
For information about replacing ink cartridges, see Replace the ink cartridges. For information
about ordering ink cartridges, see Order printing supplies online. For information about recycling
used ink supplies, see HP inkjet supplies recycling program.
NOTE: Ink from the cartridges is used in the printing process in a number of different ways,
including in the initialization process, which prepares the printer and cartridges for printing. In
addition, some residual ink is left in the cartridge after it is used. For more information see
www.hp.com/go/inkusage.
Cartridge Problem
The ink cartridge identified in the message is missing, damaged, incompatible, or inserted into the
wrong slot in the printer.
NOTE: If the cartridge is identified in the message as incompatible, see Order printing
supplies online for information about obtaining cartridges for the printer.
To solve this problem, try the following solutions. Solutions are listed in order, with the most likely
solution first. If the first solution does not solve the problem, continue trying the remaining
solutions until the issue is resolved.
208
Errors (Windows)
Solution 1: Turn the printer off and on
Turn off the printer, and then turn it on again.
If the problem persists, try the next solution.
Solution 2: Install the ink cartridges correctly
Make sure all of the ink cartridges are properly installed:
1. Gently pull open the ink cartridge access door.
2. Remove the ink cartridge by pushing it in to release it, and then pulling it firmly toward you.
3. Insert the cartridge into the slot. Press firmly on the cartridge to ensure proper contact.
4. Close the ink cartridge access door and check if the error message has gone away.
Replace the ink cartridge
Replace the indicated ink cartridge. For more information, see Replace the ink cartridges.
NOTE: If your cartridge is still under warranty, contact HP support for service or
replacement. For more information about ink cartridge warranty, see Ink cartridge warranty
information. If the problem persists after you replace the cartridge, contact HP support. For
more information, see HP support.
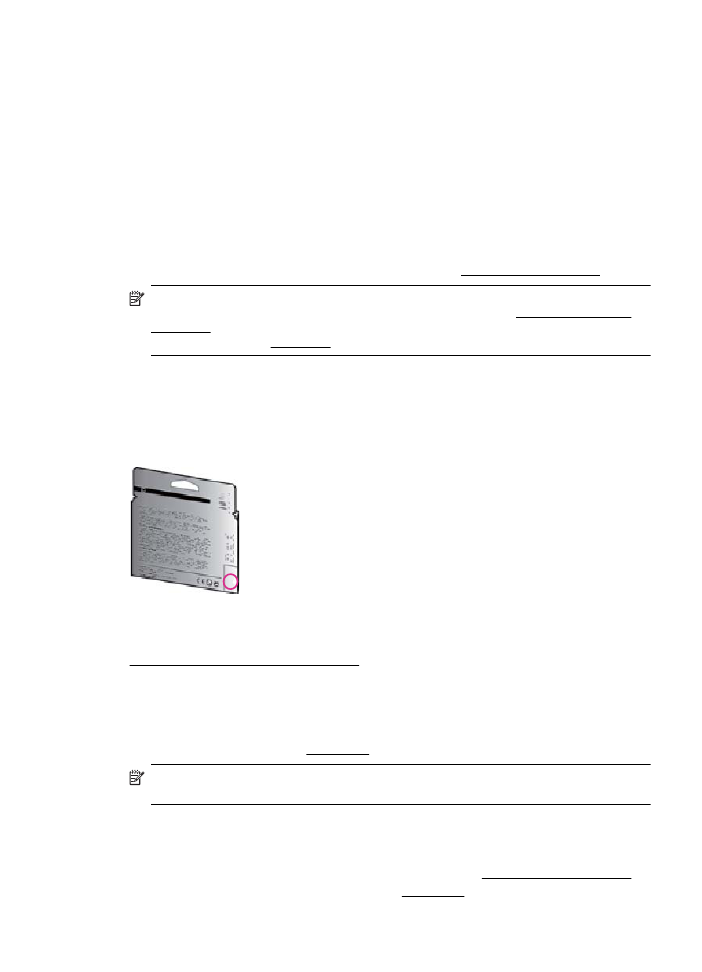
Incompatible older generation cartridge installed
You will need to use a newer version of this cartridge. In most cases you can identify a newer
version of the cartridge by looking at the exterior of the cartridge package. Find the Warranty Ends
date.
If it says ‘v1’ several spaces to the right of the date, then the cartridge is the updated newer
version.
Click here to go online for more information.
Paper Mismatch
The paper size or type selected in the printer driver does not match the paper loaded in the
printer. Make sure that the correct paper is loaded in the printer, and then print the document
again. For more information, see Load media.
NOTE: If the paper loaded in the printer is the correct size, change the selected paper size
in the printer driver, and then print the document again.
Paper too short
The paper size is not supported by the printer.
For more information about the supported sizes of the printer, see Understand supported sizes.
For more information about loading the media, see Load media.
Paper too short
209

The cartridge cradle cannot move
Something is blocking the ink cartridge cradle (the part of the printer that holds the ink cartridges).
To clear the obstruction, press the
(Power) button to turn off the printer, and then check the
printer for jams.
For more information, see Clear jams.
Paper Jam
Paper has become jammed in the printer.
Before you try to clear the jam, check the following:
•
Make sure that you have loaded paper that meets specifications and is not wrinkled, folded,
or damaged. For more information, see Media specifications.
•
Make sure that the printer is clean. For more information, see Maintain the printer.
•
Make sure that the trays are loaded correctly and are not too full. For more information, see
Load media.
For instructions on clearing jams, as well as more information about how to avoid jams, see Clear
jams.
The printer is out of paper
The default tray is empty.
Load more paper, and then press the button to the right of OK.
For more information, see Load media.
Printer Offline
The printer is currently offline. While offline, the printer cannot be used.
To change the printer's status, complete the following steps.
1. Click Start, point to Settings, and then click Printers or Printers and Faxes.
- Or -
Click Start, click Control Panel, and then double-click Printers.
2. If the printers listed in the dialog box are not being displayed in Details view, click the View
menu, and then click Details.
3. If the printer is Offline, right-click the printer, and click Use Printer Online.
4. Try using the printer again.
Printer Paused
The printer is currently paused. While paused, new jobs are added to the queue but are not
printed.
To change the printer’s status, complete the following steps.
1. Click Start, point to Settings, and then click Printers or Printers and Faxes.
- Or -
Click Start, click Control Panel, and then double-click Printers.
2. If the printers listed in the dialog box are not being displayed in Details view, click the View
menu, and then click Details.
3. If the printer is paused, right-click the printer, and click Resume Printing.
4. Try using the printer again.
Appendix G
210
Errors (Windows)
Document failed to print
The printer could not print the document because a problem occurred in the printing system.
For information about solving printing problems, see Solve printer problems.
Printer failure
There was a problem with the printer. Usually, you can resolve such problems by completing the
following steps:
1. Press the (Power) button to turn off the printer.
2. Unplug the power cord, and then plug in the power cord again.
3. Press the (Power) button to turn on the printer.
If this problem persists, write down the error code provided in the message, and then contact HP
support. For more information about contacting HP support, see HP support.
Door or cover open
Before the printer can print documents, all doors and covers must be closed.
TIP: When completely closed, most doors and covers snap into place.
If the problem persists after you’ve securely closed all doors and covers, contact HP support. For
more information, see HP support.
Previously used ink cartridge installed
The ink cartridge identified in the message was previously used in a different printer.
You can use ink cartridges in different printers, but if the cartridge was left outside of a printer for
an extended period of time, the print quality of your documents might be affected. Also, if you use
ink cartridges that have been used in a different printer, the ink level indicator might be inaccurate
or unavailable.
If the print quality is unsatisfactory, try cleaning the printheads.
NOTE: Ink from the cartridges is used in the printing process in a number of different ways,
including in the initialization process, which prepares the printer and cartridges for printing,
and in printhead servicing, which keeps print nozzles clear and ink flowing smoothly. In
addition, some residual ink is left in the cartridge after it is used. For more information, see
www.hp.com/go/inkusage.
For more information about storing ink cartridges, see Supplies.
Ink cartridges depleted
The cartridges listed in the message must be replaced to resume printing. HP recommends that
you do not remove an ink cartridge until a replacement is ready to install.
For more information, see Replace the ink cartridges.
Ink cartridge failure
The cartridges listed in the message are damaged or have failed.
See Replace the ink cartridges.
Ink cartridge failure
211

Printhead failure
There is a problem with the printhead. Contact HP support for service or replacement. For more
information about contacting HP support, see HP support.
Printer supply upgrade
The cartridge listed in the message can only be used to upgrade one printer. Click OK to use it on
this printer. If you do not wish to proceed with the supply upgrade for this printer, click Cancel
Print and then remove the cartridge.
Printer supply upgrade successful
The supply upgrade was successful. The cartridges listed in the message can now be used in the
printer.
Printer supply upgrade problem
Try to get the printer to recognize the supply upgrade cartridge.
1. Remove the supply upgrade cartridge.
2. Insert the original cartridge in the carriage.
3. Close the access door, then wait until the carriage stops moving.
4. Remove the original cartridge, then replace with the supply upgrade cartridge.
5. Close the access door, then wait until the carriage stops moving.
If you still receive a supply upgrade problem error message contact HP support. For more
information about contacting HP support, see HP support.
Non-HP ink cartridges installed
HP cannot guarantee the quality or reliability of non-HP supplies. Printer service or repairs
required as a result of using a non-HP supply will not be covered under warranty. If you believe
you purchased Genuine HP ink cartridges, visit HP at www.hp.com/go/anticounterfeit for more
information or to report fraud.
Using Genuine HP Cartridges has its Rewards
HP rewards loyal customers for using genuine HP supplies. Click the button below the message
to view Rewards online. Reward may not be available in all regions.
Counterfeit Cartridge Advisory
The installed cartridge is not a new, genuine HP cartridge. Contact the store where this cartridge
was purchased. To report suspected fraud, visit HP at www.hp.com/go/anticounterfeit. To
continue using the cartridge, click Continue.
Used, Refilled or Counterfeit Cartridge Detected
The original HP ink in the cartridge has been depleted. The solution for this problem is to replace
the ink cartridge or click OK to continue using the cartridge. For more information about replacing
the cartridge, see Replace the ink cartridges. HP rewards loyal customers for using genuine HP
Appendix G
212
Errors (Windows)
supplies. Click the button below the message to view Rewards online. Rewards may not be
available in all regions.
WARNING! HP's ink cartridge warranty does not cover non-HP ink or cartridges. HP's
printer warranty does not cover repairs or service due to use of non-HP cartridges or ink. HP
does not guarantee the quality or reliability of non-HP ink. Information about ink levels will not
be available.
Use SETUP cartridges
When you first setup the printer, you must install the cartridges that shipped in the box with the
printer. These cartridges are labeled SETUP, and they calibrate your printer before the first print
job. Failure to install the SETUP cartridges during the initial product setup causes an error. If you
installed a set of regular cartridges, remove them and install the SETUP cartridges to complete
printer setup. After printer setup is complete, the printer can use regular cartridges.
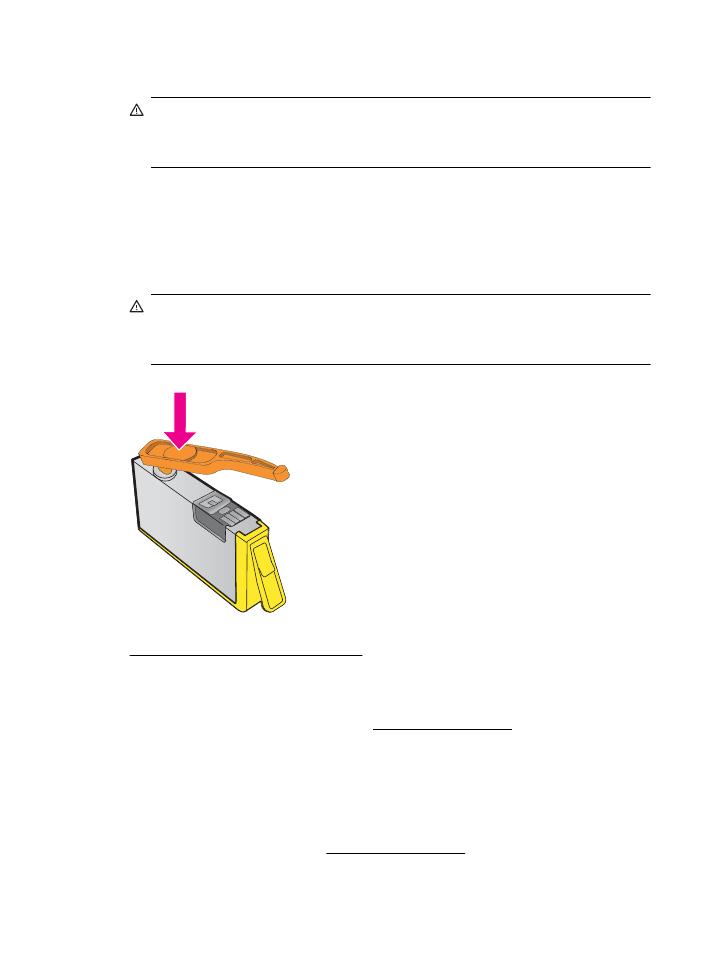
WARNING! You must replace the orange caps on the regular cartridges you remove, or they
will quickly dry out. Do not open or uncap cartridges until you are ready to install them.
Leaving caps on the cartridges reduces ink evaporation. You can use the orange caps from
the SETUP cartridges if necessary.
Click here to go online for more information .
Do not use SETUP cartridges
SETUP cartridges cannot be used after the printer has been initialized. Remove and install non-
SETUP cartridges. For more information, see Replace the ink cartridges.
Not enough ink at startup
The used cartridges listed in the message might not have enough ink to complete one-time
startup processes.
Solution: Install new cartridges or click OK to use installed cartridges.
If startup cannot complete with installed cartridges, new cartridges will be needed. For information
on how to install new cartridges, see Replace the ink cartridges.
Not enough ink at startup
213

Use black ink only?
The cartridges listed in the message are out of ink.
Solutions: To print in color, replace the empty cartridges. For information about how to install new
cartridges, see Replace the ink cartridges.
To temporarily print using Black ink only, click Use Black Only. The printer will replace color with
grayscale. The empty cartridges will need to be replaced soon.
CAUTION: Do NOT remove the empty color cartridge to print in Use Black Only mode.
Use color ink only?
The black cartridge is out of ink.
Solutions: To temporarily replace black with color, click Use Color Only. Black will be simulated.
Text and photo quality will differ from those printed when using all cartridges. The black cartridge
will need to be replaced soon.
To print with black, replace the black ink cartridge. For information about how to install new
cartridges, see Replace the ink cartridges.
CAUTION: Do NOT remove the empty black cartridge to print in Use Color Only mode.
Incompatible ink cartridges
The ink cartridge is not compatible with your printer.
Solution: Remove this cartridge immediately and replace with a compatible ink cartridge. For
information about how to install new cartridges, see Replace the ink cartridges.
Ink sensor warning
The ink sensor is reporting an unexpected condition. This could be caused by the cartridge, or the
sensor may have failed. If the sensor has failed, it can no longer sense when your cartridges are
out of ink. Printing with an empty cartridge will cause air to enter the ink system, which causes
poor print quality. Significant amounts of ink will be used up to recover from this condition, which
will deplete much of the ink supply for all cartridges.
Solution: Click OK to continue printing or replace the cartridge. For information about how to
install new cartridges, see Replace the ink cartridges.
Problem with printer preparation
The printer clock has failed and ink preparation may not be complete. The estimated Ink Level
gauge might be inaccurate.
Solution: Check the print quality of your print job. If it is not satisfactory, running the printhead
cleaning procedure might improve it. For more information, see Clean the printhead.
Color cartridge out of ink
The cartridges listed in the message are out of ink.
Solutions: To print in color, replace the empty cartridges. For information about how to install new
cartridges, see Replace the ink cartridges.
Appendix G
214
Errors (Windows)

To temporarily print using black ink only, click Cancel Print and then re-send the print job. The
Use black ink only? message appears before the job prints. The empty cartridges will need to be
replaced soon.
CAUTION: Do NOT remove the empty color cartridge to print in Use Black Only mode.
Black cartridge out of ink
The black cartridge is out of ink.
Solutions: Replace the black ink cartridge. For information about how to install new cartridges, see
Replace the ink cartridges.
CAUTION: Do NOT remove the empty black cartridge to print in Use Color Only mode.
To temporarily replace black with color, click Cancel Print and re-send the print job. The Use
color ink only? message appears before the job prints. The black cartridge will need to be
replaced soon.
ADF cover open
Close the cover of the ADF to continue.
Problem with ink system
Please remove the ink cartridges and examine them for any sign of leaks. If any cartridges have
leaks, contact HP. For more information about contacting HP, see HP support. Do not use
cartridges that are leaking.
If there are no leaks, re-install cartridges and close the printer cover. Turn the printer off then on
again. If you get this message a second time, contact HP. For more information about contacting
HP, see HP support.
Problem with ink system
215